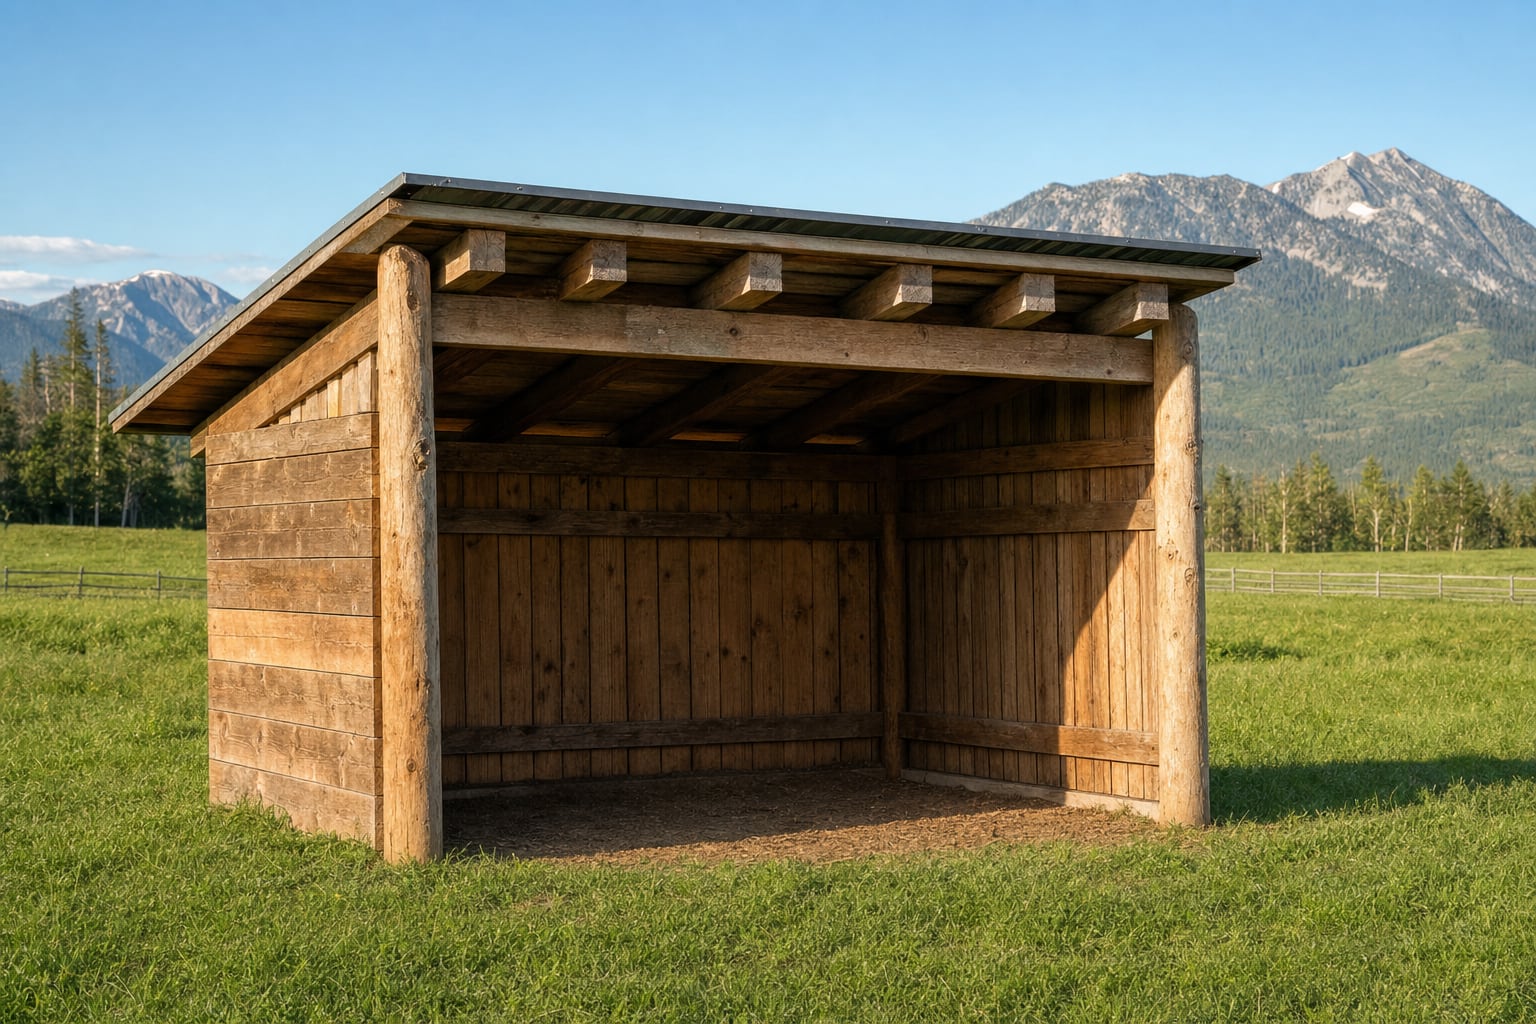
Three-sided shelters are the workhorse of a Montana property. How to size one, which way to face it, and what a timber package covers.
In the vast and rugged landscapes of Montana, a loafing shed or horse shelter is not just a luxury, but a necessity for anyone managing livestock. These three-sided structures offer crucial protection from the elements, ensuring the well-being of horses and other animals year-round. Building one with a timber package offers a solid, cost-effective solution that aligns with the natural beauty of the region. Here, we dive into the considerations and steps involved in constructing a reliable loafing shed, focusing on sizing, orientation, and the components included in a timber package.
Understanding the Importance of a Loafing Shed
A loafing shed serves as a haven for horses and other livestock in the open expanses of Montana. These structures provide essential shelter from harsh weather conditions, including heavy snow in winter, relentless summer heat, and the ever-present Montana winds. Without adequate protection, animals can suffer from stress or health issues caused by exposure to these extremes, reducing their overall well-being and productivity.
The strategic placement and construction of a loafing shed can make a significant difference in the health and comfort of your animals. In the colder months, it provides a warm escape from snow and biting winds, while during the hotter periods, it offers a cool, shaded retreat. Additionally, having a dedicated shelter reduces the amount of time animals spend exposed to unfavorable conditions, which is particularly important in areas like Paradise Valley, Livingston, and the Shields Valley.
Deciding on the Right Size for Your Shed
The size of your loafing shed should be determined by the number of animals you need to shelter. A general rule of thumb is to allocate about 100 square feet per horse. This allows enough space for the animals to move around comfortably and avoid overcrowding, which can lead to stress and potential injury.
For those with smaller herds or just a few horses, a shed measuring 12 feet by 24 feet usually suffices. However, for larger operations, you might consider expanding the structure to accommodate more animals. In areas like Bozeman and Big Sky, where properties might be more expansive, larger sheds can easily be incorporated into the landscape.
Keep in mind that the terrain and layout of your property will also influence the dimensions of the shed. It’s wise to measure the area where you plan to build, ensuring there is enough space not just for the structure itself, but also for easy access and maneuverability for both animals and equipment.
Choosing the Right Orientation for Maximum Protection
The orientation of your loafing shed is critical to its effectiveness in providing shelter. In Montana, prevailing winds often come from the west or northwest, so positioning the open side of the shed to face away from these winds is advisable. This typically means orienting the open side to the east or southeast, providing maximum protection against harsh winds and precipitation.
In addition to wind protection, consider how the shed will receive sunlight throughout the day. An eastern or southeastern orientation will allow the early morning sun to warm the interior, providing a comfortable start to the day for your animals. This is especially beneficial during the cold winter months in places like Gardiner and Emigrant, where early morning temperatures can be quite low.
Exploring Timber Package Options
Opting for a timber package simplifies the construction process by providing all the necessary materials to build your loafing shed. At Paradise Valley Timber Co., our timber packages come with rough-cut lumber that can be tailored to your specific project requirements. This includes full-dimension boards, beams, and posts needed to construct a sturdy, reliable structure.
Our packages typically cover everything from the framework to the roofing materials, ensuring you have all components needed to complete the project. However, it’s essential to request current pricing and availability, as these can vary based on market conditions and specific material needs.
For those seeking a more customized approach, our custom milling services allow you to specify dimensions and materials that perfectly match your vision. This service does have minimum order requirements, but it provides the flexibility to ensure your shed meets both functional and aesthetic goals.
Step-by-Step Construction Guide
1. Site Preparation
Before construction begins, carefully select and prepare your site. The ground should be level and well-drained to prevent water pooling and ensure a stable foundation. Consider laying a gravel base to enhance drainage and provide a firm footing for the structure.
2. Foundation and Framing
Once the site is prepared, you can proceed with laying the foundation and framing. Use treated posts to anchor the structure securely into the ground, providing stability against the strong Montana winds. Next, install the beams and cross bracing to create the framework of the shed, ensuring all connections are secure and square.
3. Roofing and Siding
After completing the framework, add the roofing material to provide weather protection. Metal roofing is a popular choice in Montana due to its durability and ability to withstand heavy snow loads. Next, attach the siding to the three enclosed sides, using rough-cut lumber to ensure both strength and an authentic rustic appearance.
4. Finishing Touches
The final step is adding any desired finishing touches. This could include painting or staining the wood to match your existing structures or landscape, as well as installing gutters to manage water runoff effectively. Ensuring all edges are smooth and free from splinters will prevent injuries to your animals.
Weather Considerations for Construction Timing
When planning your construction, consider Montana’s weather patterns, which can be unpredictable. Ideally, the shed should be built in the late spring or early summer, when the ground is dry and conditions are most favorable. This timing allows the structure to be ready for use before the harsher fall and winter weather sets in.
Avoid starting construction during the late fall or winter, as snow and frozen ground can complicate the building process. For residents in areas like Belgrade and Clyde Park, where winter conditions can be particularly severe, planning ahead is key to ensuring timely completion.
Local Insights for Specific Areas
Each region in Southwest Montana presents unique challenges and considerations for building a loafing shed. In Paradise Valley, for example, properties often experience rapid changes in weather, so choosing durable materials and a robust design is crucial. Meanwhile, in the Shields Valley, where properties can be more remote, ensuring easy access to materials and tools is essential for a smooth building process.
Bozeman and Big Sky, with their rapidly growing populations, might face stricter building codes and regulations, requiring more careful planning and possibly permits before construction. Being aware of local guidelines in these areas can prevent delays and ensure compliance with any legal requirements.
Common Mistakes to Avoid
When building a loafing shed, there are several common mistakes to avoid. One major error is failing to consider the prevailing wind direction, which can render the shed ineffective if the open side faces directly into the wind.
Another frequent mistake is underestimating the size needed for the number of horses. Overcrowding can lead to behavioral issues and possible injury. It's better to err on the side of slightly larger than necessary to provide ample space.
Finally, neglecting proper drainage around the site can result in water accumulation, leading to a muddy and unsafe environment for your animals. Ensuring the site is well-drained and possibly elevating the foundation can mitigate these issues.
How Ordering and Delivery Work
At Paradise Valley Timber Co., ordering your timber package is a straightforward process. Start by reaching out to us at 406-404-7501 to discuss your project needs and request a quote. We will guide you through the options available, ensuring you get the right materials for your loafing shed.
Once your order is placed, delivery times will vary based on the size of the order and your location. Larger orders may qualify for discounted delivery, especially for properties situated further afield in areas like Gardiner or Wilsall. We strive to accommodate your schedule and ensure timely delivery of materials to your site.
Frequently Asked Questions
What is included in a timber package?
A timber package typically includes all the rough-cut lumber, beams, posts, and roofing materials necessary for constructing a standard loafing shed. Additional components or custom milling can be arranged based on your specific project needs.
Can I customize the dimensions of my shed?
Yes, you can customize the dimensions through our custom milling services, which allow you to specify the size and materials. Keep in mind there are minimum order requirements for this service.
How long will construction take?
Construction timelines can vary depending on the size and complexity of the shed, as well as the weather conditions. Typically, a simple loafing shed can be completed within a week, provided you have all materials ready and favorable weather.
Do you offer installation services?
While we provide material-only packages, we also offer installation through our partner crew. This service ensures professional assembly and installation of your loafing shed, taking the hassle out of the construction process.
Whether you're a seasoned rancher or new to livestock management, building a loafing shed is an investment in the health and safety of your animals. Call 406-404-7501 today to discuss your project and request a quote. Our team at Paradise Valley Timber Co. is ready to assist you in choosing the perfect timber package for your needs.
Questions about your project? Call 406-404-7501 or request a quote.